


Darkest Dungeon is renowned for being a difficult game. But for some of us, that isn’t enough. If you want the ultimate challenge, the real test of your resolve, strategic thinking and sheer tenacity has got to be finishing the game on the hardest difficulty setting with no light whatsover. Welcome to the very challenging (but also satisfying and fun) Torchless Bloodmoon Darkest Dungeon run.
Table of Contents – Quick links
Click the links below to jump further down the article, to the specified section.
- Setup video.
- “-skiptutorial” load option (start with all buildings unlocked).
- Mod list for torchless run.
- How to install mods in Darkest Dungeon.
- Strategy on The Old Road.
- Team loadout for first week.
- The first Ruins dungeon in Darkest Dungeon torchless run.
- Provisions for first dungeon.
- Layout and strategy for first dungeon.
Setup for Torchless Bloodmoon Run
Like any worthwhile endeavor in life, preparation is key. While you don’t need to do anything special to prepare for a Darkest Dungeon Torchless Bloodmoon run, there are some tips below (and shown in the video above) that can help give you a good foundation.
“-skiptutorial” Load Option: Start Darkest Dungeon With All Buildings Unlocked
When you start a new game, you’ll be introduced slowly to the buildings in the Hamlet through a ‘tutorial’ of sorts that unlocks buildings gradually over the first few weeks. If you’re attempting a torchless run, you’ve likely played through at least once before and therefore this slow introduction is unnecessary and can be a bit annoying. To disable this tutorial functionality and start with all buildings unlocked, follow the steps below:
- Open your Steam library and locate Darkest Dungeon.
- Right-hand click on the Darkest Dungeon icon and click on “Properties…”.
- Make sure you’re in the “General” tab in the left side bar.
- In the text box under the “Launch Options” section, type: -skiptutorial

Which Mods To Install For Darkest Dungeon Torchless Run
The only mods that I would strongly recommend for a torchless run are:
- [Challenge] Dark Run by user eudaimonia: This mod automatically snuffs out your torch for you, and also prevents it being re-lit by skills, camping or any other mechanics which would usually increase the light level. You can still do a dark run without this, but it’s a great quality of life improvement to be saved from constantly having to snuff out your torch.
- Fully Lit Darkness by user Maester Silvio: This one is probably less essential than ‘[Challenge] Dark Run’, but I still really like playing with it. Basically it makes the aesthetics/visuals lighter – as if you had a bright light level – even in total darkness. It doesn’t change anything about the actual gameplay. It’s nice to be able to enjoy the challenge of a dark run without the dreariness and monotony of constant total dark visuals.
How to Install Mods in Darkest Dungeon
There are two main ways to install mods for Darkest Dungeon: Manually or via Steam. As it’s the easiest method – and most people reading this are likely to be using Steam – I’m going to step through the latter method:
- Open your steam library and click on the Darkest Dungeon icon to open the Darkest Dungeon game hub.
- Click on the “Workshop” tab.
- Browse or search for the mod you want.
- On the mod’s page, click the green “+ Subscribe” button.
- When you’ve subscribed to all the mods that you want to, launch the game.
- Either start a new campaign, or use an existing campaign, either way – click the blue icon next to the campaign’s name in the campaign list screen.
- This will open the mod list where you can re-order your mods. Mods at the top have the highest priority – i.e. if two mods affect the same thing differently in-game, the one higher up in the list will be the one whose effects takes priority.
- Tick the box next to a mod to enable it in the campaign.
Strategy On The Old Road
The main thing to take note of on the Old Road is just avoiding stress before reaching The Hamlet, so that Reynauld and Dismas are as stress-free as possible for the first dungeon. There are a few tips below that can help you optimise this very first section of the game:
- Don’t interact with the curio: During a normal difficulty game, the first curio that you encounter on the Old Road is a special Bandit’s Tent that isn’t found anywhere else in the game – the Brigand’s Tent. This curio will only give you treasure when interacted with (no chance of any negative outcomes). When you’re playing on Stygian or Bloodmoon difficulty, however, the tent is replaced by the Transcendent Terror, which like the Brigand’s Tent only appears in this one spot. It has a 100% chance to give you +100 stress, so best to avoid.
- Eat food to heal after first battle: After your first short battle with the single Brigand Cutthroat in the first hallway, remember that you have two food rations that you can feed to either Reynauld and or Dismas to heal them if needed before entering the next room and the final battle.
- Preemptively shuffle yourself: Due to the high likelihood of your team being surprised and shuffled because of playing torchless. A potential strategy is to pre-shuffle them yourself before entering the second room, so that when they get re-arranged, they end up back in the correct position – i.e. Reynauld in first position, Dismas in second. Of course it’s not guaranteed that you’re going to be shuffled and the enemies in the room battle have attacks that can move Reynauld back even if you do manage to end up in the right orientation, so this isn’t essential.
Team Loadout For First Week
I’m assuming that if you’re attempting a torchless bloodmoon run, you’re already somewhat familiar with the game, and with team build/loadout strategies. So rather than diving into the basics I want to highlight some of the main differences on this difficulty, and especially with playing in the pitch black.
- Reduce dead positions: Ideally you want your adventurers to have at least one skill useable from every position. Because you’re inevitably going to be getting shuffled a lot, and you don’t want to be left with nothing to do on a turn. One of your main problem children on this front is going to be Reynauld who starts off with no useable skills in positions 3 or 4. I recommend using the “-skiptutorial” loading option (see above).
- Delete and restart until you get a decent Vestal and Plague Doctor: Your starting Crusader (Reynauld) and Highwayman (Dismas), will always have the same skills unlocked at the start of the game. When you get to the Hamlet, your stage coach will always have a Vestal and a Plague Doctor. But unlike Reynauld and Dismas, these two will have a randomised name and randomised skills. There are definitely going to be some skills that are more useful than others. For example, my favourite skills for the Vestal at the start would be both Divine Grace and Divine Comfort so I can use focussed or party-wide heals, Dazzling Light for stun (always incredibly useful, I try to have a stun skill on every hero that it’s possible with) and Hand of Light so I’ve got something to do if I end up in 1st rank (you could also use Mace Bash for this but I like the extra buffs you get with Hand of Light). It doesn’t take long to get through the Old Road to the Hamlet, so it’s a viable strategy to restart a few times to get a good loadout with your first two stage coach heroes.
- Healing is important: If you can get Battlefield Medicine on your Plague Doctor – awesome! If you can manage both heals on your Vestal – fantastic! Want to splash the cash a little and unlock Reynauld’s Inspiring Cry for the stress heal? – not a bad idea. Basically, heal and stress heal are gonna be your best friends, you pretty much can’t have too much of it.
The First Ruins Dungeon in Torchless Run
The first ruins dungeon is not particularly hard, even on bloodmoon difficulty with zero torch light. But that being said, the trick to surviving this torchless run is going to be conserving resources and reducing stress at every opportunity. Which means that even the first and easiest level in the game is a potential opportunity to maximise your efficiency.
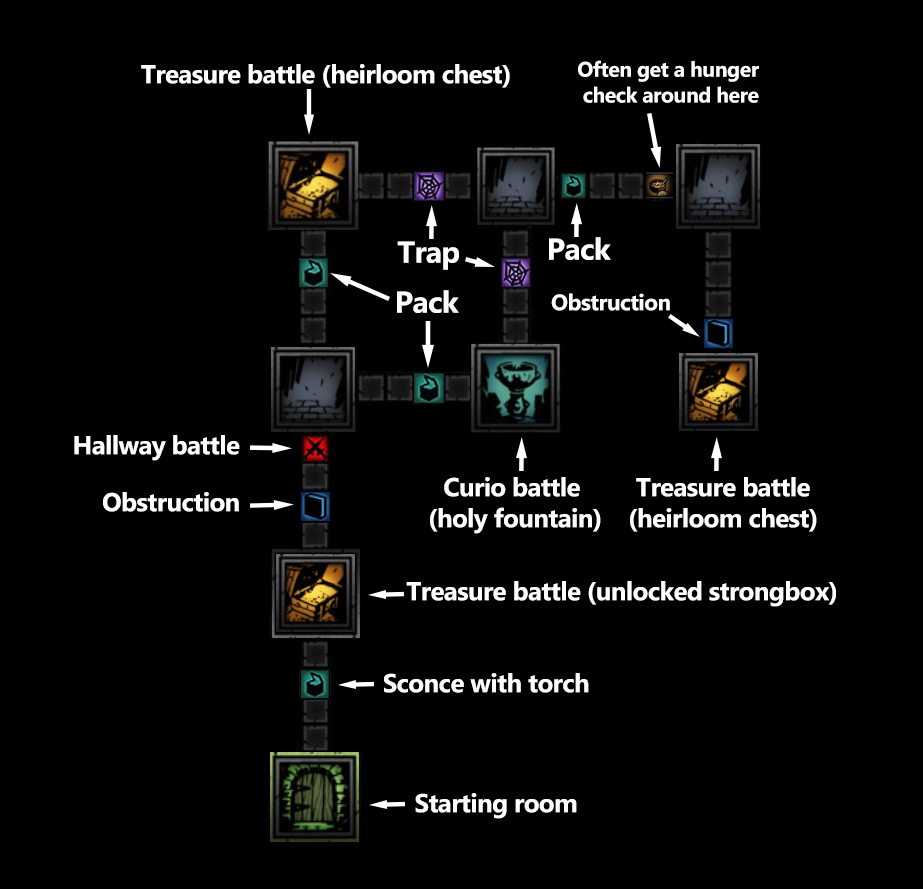
What makes this first dungeon even more interesting is the fact that it’s fixed, due to it acting as a tutorial of sorts for many mechanics in the game. So every trap, corridor fight, room battle and curio is predetermined and will be the same on each playthrough. Unlike the majority of other dungeons which are randomly generated.
This means we can strategise based on the exact layout of the dungeon to choose the best provisions and plan our run.
Provisions For First Ruins Dungeon in Torchless
Our overall strategy for the early weeks of the Torchless run is to make $15,000 ASAP so we can buy the Bank by week 10, setting ourselves up for quicker gold acquisition throughout the rest of the game. To achieve this we want to only buy as many provisions as we absolutely need for our outings. This is my pick for the first ruins dungeon on torchless:
- 1 Shovel: There are two obstructions in the dungeon, only one of which is mandatory. You’ll definitely get one shovel. There is a chance that Reynauld will still it due to his Kleptomaniac perk. But there’s also a chance that you’ll find an extra one in treasure chests or pack curios. Due to their expense (250 gold), I choose to purchase only one.
- 8 food: You may only trigger one hunger check, meaning you could save 300 gold by only taking 4. But being able to use extra food for healing outside of battles makes it very useful and I think worth the extra expense.
- 1 Holy Water and 1 Antivenom: You get these for free thanks to having a Crusader and a Plague Doctor in your party. The Antivenom isn’t particularly useful, but the Holy Water is essential for using in the Holy Fountain, to get stress relief and health.
Layout and Strategy For First Ruins Dungeon in Torchless
Note: Ignore Team compostition in screenshots below
I took the screenshots below while trying out a strategy of only using a three person team in the first week. This was to send Reynauld off for curing his Kleptomania straight away. After a fair bit of testing it become apparent that the three person team is not the best idea. So just pretend I’ve got the normal four person, usual suspects team (as setup in the video at the top of this article).
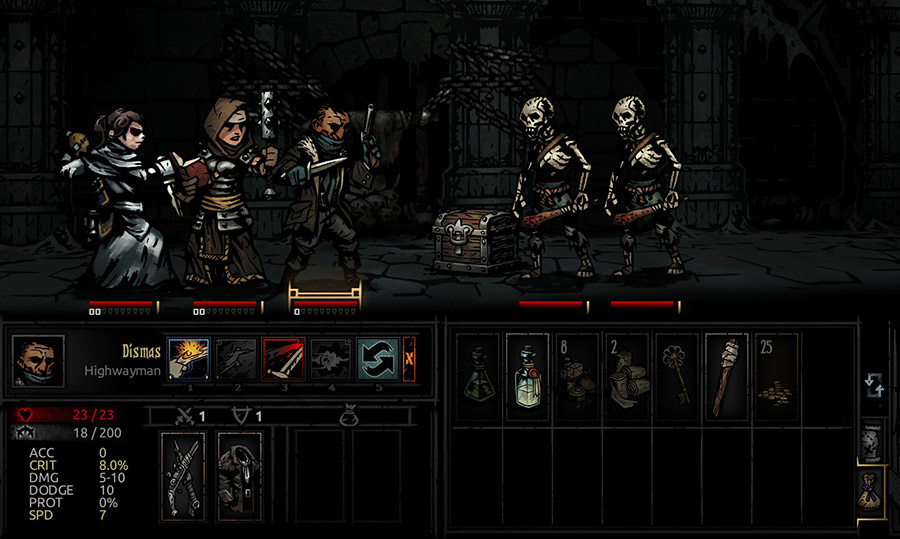
After moving through the first hallway, collecting any treasure contained in the sconce curio, you’ll arrive in the first room battle. This one shouldn’t give you much trouble, with the enemy team only consisting of two Bone Rabble, who are one of the weakest enemies you’ll face in the game.
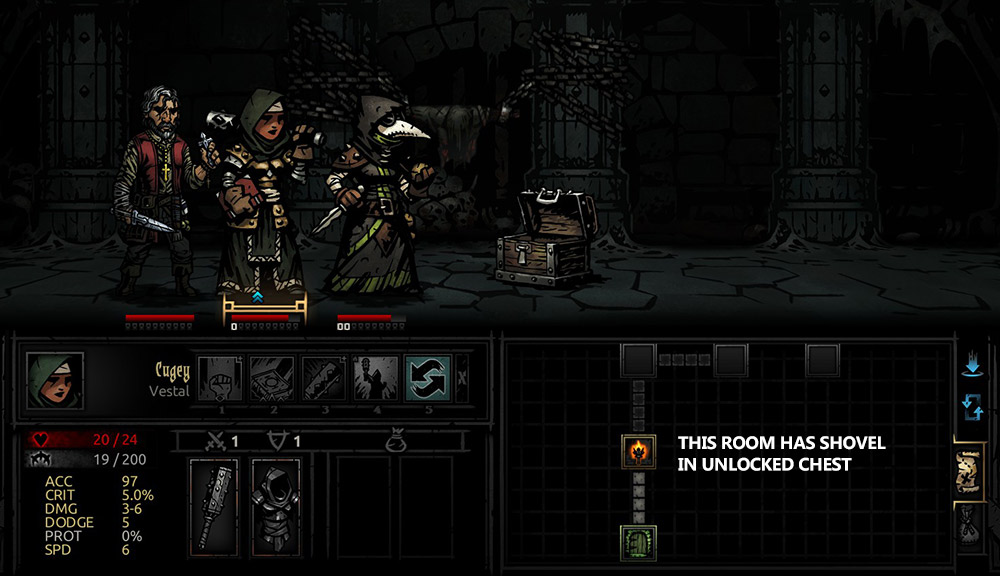
After defeating the two Bone Rabble you want to ensure you open the unlocked strongbox (no items need to be used on it) where you’ll find a shovel with some other randomised loot. Cross your fingers that Reynauld doesn’t steal the shovel.
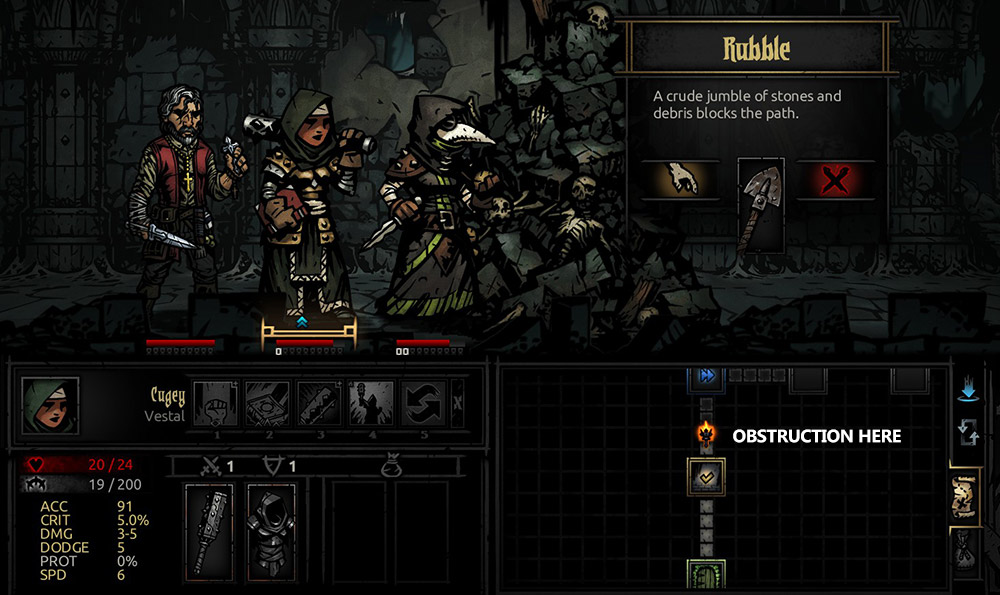
In the next hallway you’ll encounter your first obstruction. Even if Reynauld did steal the shovel out of the unlocked strongbox you’ll still have the shovel you bought with you. If that does happen and you end up using your provision shovel, you can hope to find another shovel before the last room battle, or alternatively complete the dungeon without taking on the optional final battle.
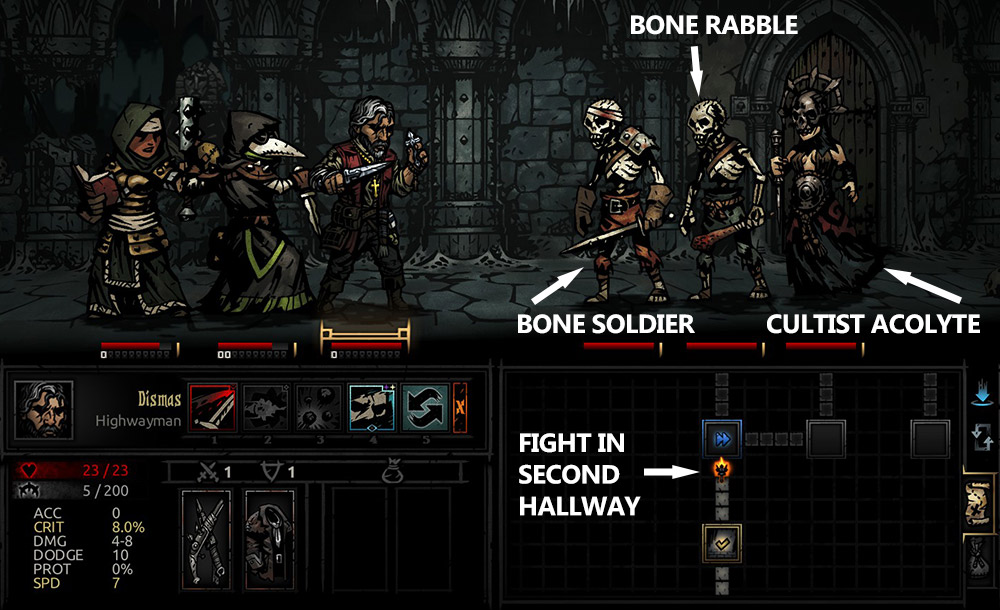
Your first (and only, as long you don’t trigger a random one) hallway battle is tougher than the first room battle. You now have a Bone Soldier, and more worryingly, a Cultist Acolyte to contend with. Due to it’s stress dealing, target the Acolyte first, followed by the Bone Soldier, leaving the weak Bone Rabble to last.
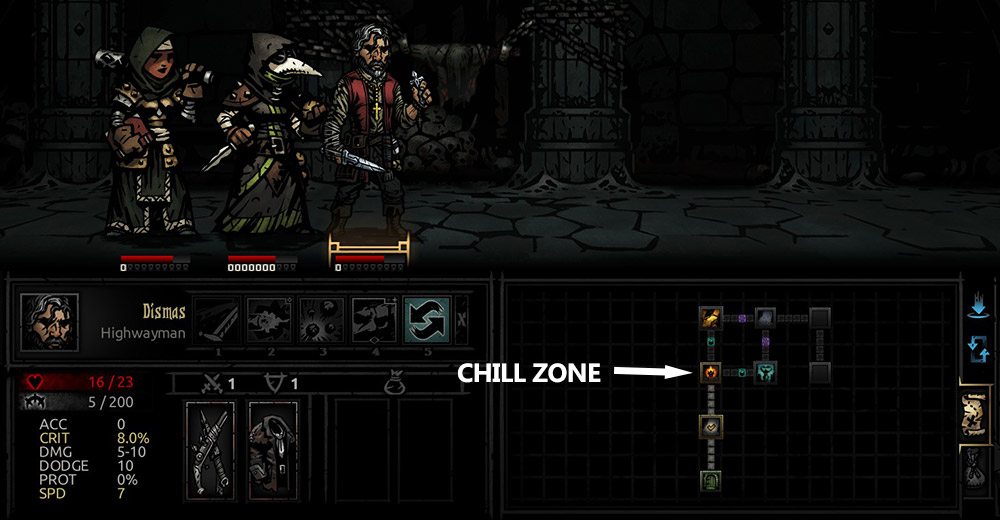
You can take a breather in the next room, nothing’s happening here. Hopefully as you walk into it though, you’ll proc some scouting for the following area. Revealing the traps ahead.
You can choose to head up for the treasure battle or right for the curio battle. You might want to prioritise going right to the curio first if your Vestal has somehow gotten quite high stress, so you can use the Holy Fountain for stress relief before she becomes afflicted. Other than that it doesn’t really matter which direction you go in first. Hopefully you’ve scouted the traps so you can get a small amount of stress heal for your Highwayman from disarming them. If not, you’ll just have to take the hit on your way past.
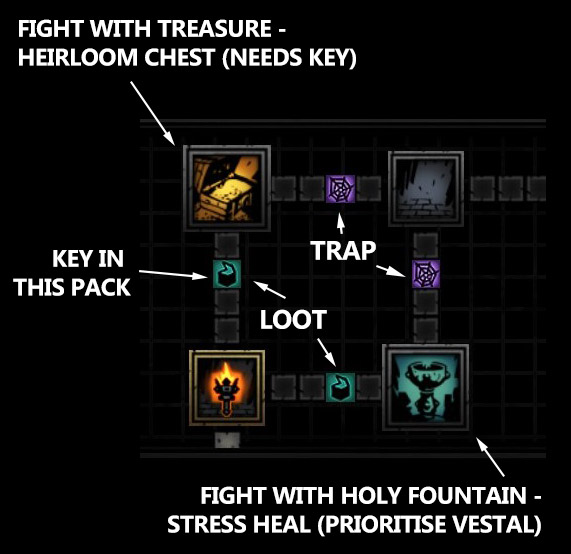
The treasure room batttle in the top left is a decent challenge, once again with a Cultist Acolyte in the third rank which you’ll want to take out first. You’ll have a key from the pack curio in the hallway on the way to the room (unless Reynauld stole it), which you can use to unlock the heirloom chest after the battle.
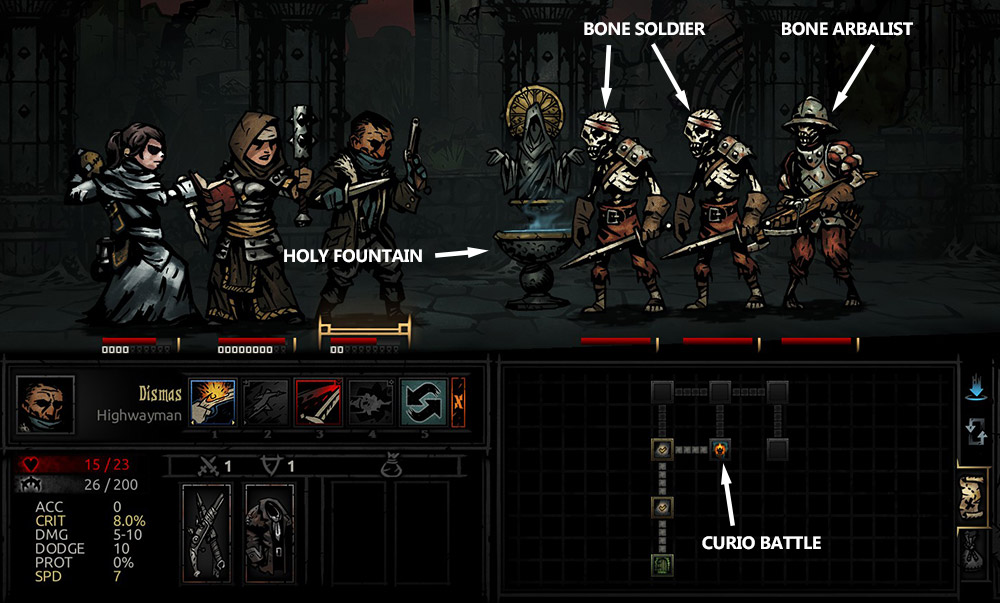
The curio room battle in the bottom right has a Bone Arbalist in place of an Acolyst in the third rank, but likewise should be taken out first. Once you’ve dispatched of the bone trio, you’ll be able to get a heal and some stress relief by using your holy water on the fountain. While you may be tempted to stress heal the hero with the greatest burden at the time, I’d recommend prioritising your Vestal, even if she doesn’t have as much stress as some other heroes, so that she’s more likely to be ready to take out again in week 2.

Loot the pack curio in the top hallway. Hopefully by this point you’ve found an extra key in one of the packs for using in the last room. You might also have been lucky enough, like in the photo above, to have found some extra food. If so, use this to heal your party.
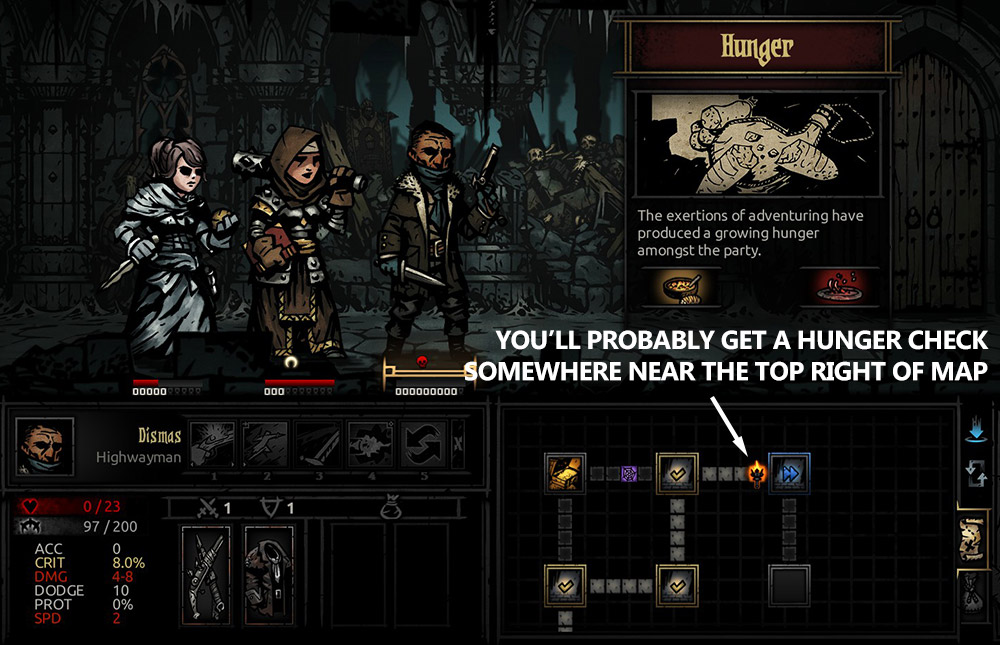
Depending on which route you’ve taken you’ll probably get your first hunger check somewhere in the top hallway.

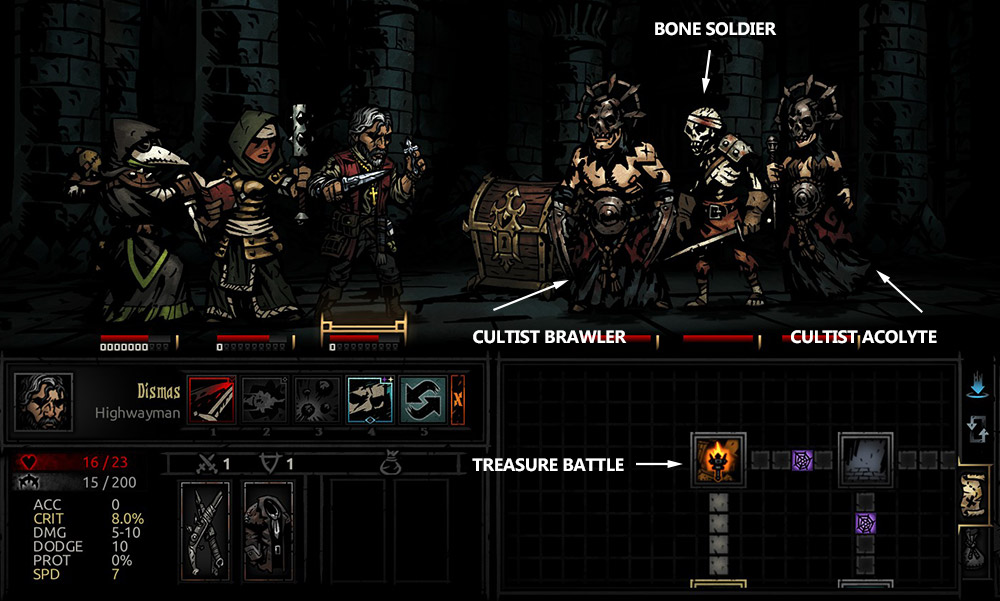
If you’ve visited both the treasure room and the curio room in the top left area of the map, the final room is optional (as you’ve already completed 90% of the level, which is all that’s needed to complete the quest). But if you’ve managed your stress well enough, your health is looking okay and Reynauld hasn’t stolen one of your shovels, you might want to consider completing the final room for the extra loot. Also, unless you packed a key, you’ll want to have found an extra one on the way here for use on the heirloom chest. If you didn’t bring an extra key and haven’t found one, the final room might not be worth it.

The final battle will the the hardest so far. You definitely want to take out the Bone Courtier first to prevent his stress damage, followed closely by the Bone Arbalist. Once this fight is over, unlock the heirloom chest, grab your loot and get out of there! That’s your first step done on the road to completing a bloodmoon torchless run.
Feel like supporting me to write more game guides?
If you’ve found any of my guides helpful and you want to shout me a coffee to help power future work, feel free to do so through Ko-Fi below 🙂