


While the earlier dungeons such as the Stormfoot Catacombs or Minor Erdree Catacombs were fairly easy in terms of toughness of enemies, the Cliffbottom Catacombs really steps things up a bit.
This time around, in addition to the usual imps (which can be annoying enough as it is with their bleed effect and erratic movements), the Cliffbottom Catacombs also gives you large ogres to deal with.
Thanks to the increase in enemy difficulty, you may find it hard to concentrate on finding all the items the dungeon has to offer. Perhaps some guidance would be of use? If so read on. Or even easier, watch the video below, for a full step-by-step walkthrough.
Table of Contents
- How to Get to Cliffbottom Catacombs.
- Cliffbottom Catacombs Walkthrough:
- – How To Get The Nox Mirrorhelm.
- – How To Get The Scythe.
- – How To Get To The Boss Door Lever.
- – How To Defeat The Erdtree Burial Watchdog.
How To Get To Cliffbottom Catacombs
First things first – how do we actually get to Cliffbottom Catacombs? Personally, I found this one a bit tricky. Mainly because the path to the dungeon is obscured by a rise of land that can make it hard to spot when you’re not on the map screen.
My recommendation is to make your way to Liurnia Highway North site of grace and then make your way to Cliffbottom Catacombs from there. See the map below for the location of Liurnia Highway North and it’s position in relation to the Cliffbottom Catacombs.


Cliffbottom Catacombs Walkthrough
The first section of the Cliffbottom Catacombs is quite easy, and if you’ve attempted the dungeon before reading this guide, you’ve probably already made your way through a good portion of it. Regardless, I’ll step through it below.
Firstly, you’ll head down from the site of grace inside the catacombs to find an elevator platform. One thing to be aware of, is if you face backwards instead of forwards here, you can run off the platform midway through its descent, onto a ledge where you can collect a Grave Glovewort [2].

Next, walk forwards at the bottom of the elevator towards the imp you can see ahead of you. Keep in mind that there is another hidden imp waiting to ambush you from the right, at the entrance to the next room.
My tactic whenever I walk into a new room in a catacomb is to run forward but then roll back instantly using the dodge/run button. This tends to pull out any imps or other creatures waiting to ambush you.
Another method you could use here is to use your bow and arrow or other ranged attack to aggro the visible imp, so you can deal with him first before running forward to aggro any of his hidden friends.

Once you’ve dealt with the two imps in this room, you can loot a Root Resin off the corpse at the far end of the room and then turn back to head down the stairs (making sure to harvest the Grave Violet on your way).
At the bottom of the stairs you’ll find the locked boss door. There’s no enemies in this room, so you’re okay to just turn right and continue on through the dungeon. You’ll be finding a somewhat hidden imp in the next room. At the bottom of another short flight of stairs you’ll find an empty room. The aforementioned imp is hiding just around the corner to the left and will jump out as you approach.

After defeating this imp, continue down the hallway you’re in, which will open up into a multi-storey room. Ahead of you, on the next storey up you can see a statue. That statue is obscuring from view the lever you need to pull to open the boss door.
There’s a ramp that slopes down in front of you. We’ll be walking down that ramp to continue through the dungeon. Just a side note here. If you don’t care about the items inside this dungeon and mainly want to get to the boss as quickly as possible. You reach the boss door lever by dropping down the side of this ramp to an area below.
It’s a bit counter-intuitive because the lever, as we mentioned earlier, is on a level above you. But the ladder that takes you to there is found in the level below. For now we’ll continue on exploring the other areas of the dungeon. But if you want to jump ahead to the part where you find the lever, you can do so in the section of the guide: How To Get To The Boss Door Lever.

Head down the ramp and into the tunnel at the bottom. A short way into this tunnel you’ll find a pressure plate on the floor. If you step on this pressure plate, three magic bolts will shoot out of the wall at the end of the tunnel, damaging you, and anything else in their path.
Obviously, these are dangerous and you should watch out for them to protect yourself. But they can also be used to help defeat enemies in the area. A good test run of this technique is the imp that drops down from the ceiling a couple of feet from the the pressure plate. Try walking forward until he drops down and then running back to trigger the plate. As soon as you’ve triggered the plate, move to the side, against the wall of the tunnel so the bolts miss you. If you time it right, they’ll instead hit the imp, taking his health almost all the way to zero.

You’ll find the next imp just around the corner. Defeat him and you can continue forward into a large multi storey room. To reach the Scythe, Nox Mirrorhelm and other items, we need to continue the dungeon by heading up the stairs to the left.
Optionally, you can also go under the archways to the right to pick a Grave Glovewort [3]. Keep in mind if you do that there’s a large ogre enemy sleeping in the darkness under there. He’ll wake up and attack you when you pick the Glovewort. If you’re a high enough level and confident in fighting him you can simply fight him the usual way.
If you’re a bit under-leveled, you can also try using the trap back in the hallway to help defeat it. To do that simply aggro the ogre and then lead him back to the hallway. Trigger the trap while he’s in the hallway to damage him with the magic bolts. You’ll need to repeat this process a few times to fully defeat him with this method. Check out the video at the start of this guide if you want to see that technique in action.

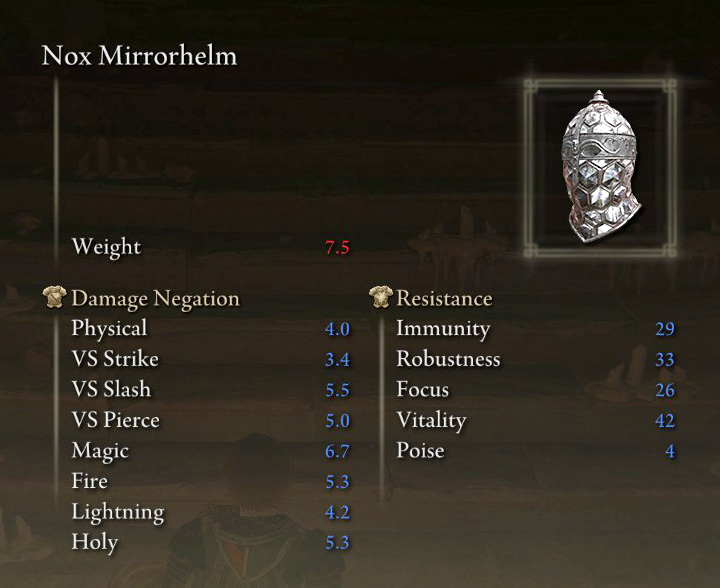
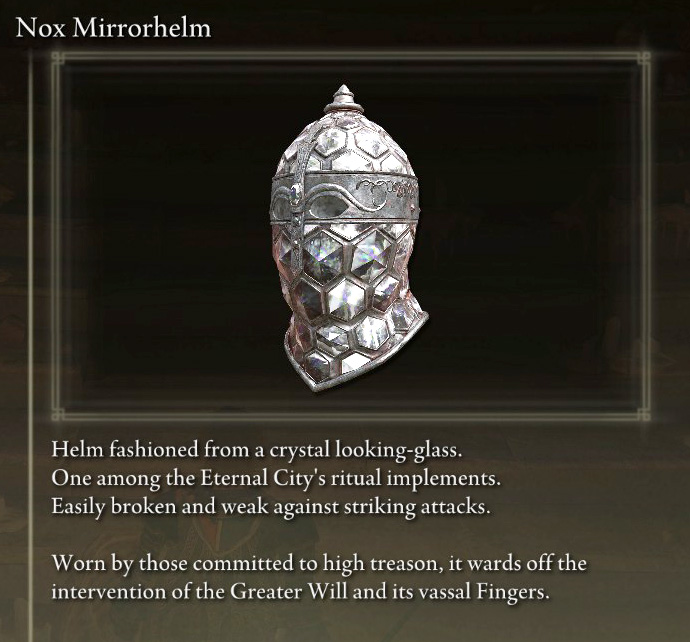
How To Get The Nox Mirrorhelm.
After defeating the ogre and collecting the Glovewort (or sneaking past him, if you chose to), head up the stairs. You’ll notice as you get near the top of the stairs that there’s another ogre to your right. You can choose to fight him if you like, which will allow you to pick up the Rune Arc on a corpse on the other side of the ogre, or you can wait for him to walk away and sneak past him.
Ahead of you, you’ll see a wall of fog, with a small statue to the left of it. After either defeating the ogre or sneaking past it when it’s back is turned, Interact with the statue and use one of your Stonesword Keys and the fog will clear. In the room ahead there’s only one enemy, an imp that drops down from the ceiling. Defeat it and you can continue on to the corpse at the back of the room. Loot the corpse and the Nox Mirrorhelm is yours. While it doesn’t have a particularly high physical defence rating, it does have decent magic defence and it looks cool as heck. Plus it’s fairly light. Personally it’s been my preferred helm ever since collecting it.

How To Get The Scythe.
Exit the Mirrorhelm room back into the room with the ogre. If you snuck past the ogre earlier you may want to fight it now so you can get the Rune Arc on the corpse behind it. If not you could continue sneaking, left, up the stairs, minding the two imps on the ledge nearby. After either sneaking or fighting your way out of this room you’ll come to a tunnel.
The tunnel has a pressure plate that triggers magic bolts, and an imp waiting to ambush you, as well as one in front of you. It’s up to you how to take these two imps out. You can use the trap to help defeat them or just step around it and fight them the normal way. Once you’ve gotten rid of them, make sure to collect the Grave Glovewort [2] from the far side of the room.

After picking the Grave Glovewort, turn right and head down the next corridor. There aren’t any enemies in this hallway. Turn left at the end which will open into an area with two exits. If you continue on straight, past the room on the left, you’ll reach a dead-end corridor with three imps hiding in it. At the end of that corridor you’ll find a Grave Glovewort [3] and a Golden Rune [3].
If you go to the room on the left you’ll find a short corridor with a trigger plate inside, and three imps, including one who ambushes you from the backwall. After defeating these imps you can collect the awesome scythe weapon from the corpse at the back of the room.
You’ve now cleared out this part of the dungeon and it’s time to head back to the start to take the route to the boss door level. To do this you can backtrack the way you’ve come, or for a short cut you can carefully drop down from the level you’re on to the floor underneath. The safest place is in the middle so that you drop onto the ramp and don’t accidentally drop all the way down two stories.

How To Get To The Boss Door Lever.
Once you’re back near the start with the room that has the ramp down, where you can see the statue on the second level, you want to drop down onto the level below, being careful of the ogre resting in the middle of the room.
At this point you can fight the ogre, but personally I was sick of taking those guys on, and what you don’t realise when you first land on that level, is if you try to fight the ogre in the first room, a second ogre from around the corner will join the fray, and then you’re fighting two ogres at once, which is a whole world of pain.
If you sneak around down there you’ll find more Grave Gloveworts and a Hefty Beast Bone. You’ll also find an exit passage. This corridor has a Grave Glovewart [2] in it and leads you to a room with a ogre on the far side. Luckily the room also has a pressure plate trap in it, which can be used to quite easily take out the ogre, you’ll just need to step on it a couple of times.

Once you’ve dispatched that ogre, continue following the path around and it will lead you to a ladder. Climb up the ladder and you’ll finally be on the level with the statue and the lever to open the boss door.
When you first reach the top of the ladder there will be another ogre to your left. You can sneak to the right instead and this ogre won’t attack. Keep in mind though that he’s blocking an item from view. If you do defeat the ogre you get to loot a body and collect the Page Ashes.
Turn to your right and you’ll walk out onto the platform with the statue and the boss door lever. There’s an imp out here waiting to attack. The platform also has a corpse with three Old Fangs on it. Loot the corpse, pull the lever and you can head out of there. To exit the area, just drop down from the platform you’re on to the level below. Once again, you’re best to do this by dropping down over the ramp.

How To Defeat The Erdtree Burial Watchdog.
Drop back down and head up the ramp, continue back through the dungeon until you get to the boss door, which will now be open. Head through the door, down a short corridor and you’ll find a misted entry. Traverse the mist to come face-to-face with an Erdtree Burial Watchdog.
If you’ve completed any of the other dungeons you’ll be familiar with this enemy and it’s somewhat clunky but still dangerous move set. There’s not a lot of strategic tips to impart here, other than to say the obvious – avoid his attacks and jump in when you can to land a blow.
If you’re finding that your weapons are under-leveled and it’s taking too long to defeat him, or you’re having trouble avoiding his blows, your best bet is to use one of your spirit summon ashes.
To help keep your ashes alive longer you can use the Grave Gloveworts that you’ve collected throughout the dungeon back in the Roundtable Hold with the spirit tuner to upgrade your favourite ash, so the spirit you summon can take more blows from the watchdog and help you eke out more damage.
Once you defeat him, you’ll be rewarded with the Kaiden Sellsword Ashes. The sellsword that these ashes summon is one of the tougher spirit companions that you can use, and is able to put up a good fight against strong opponents. A good reward for all the annoying ogres you had to put up with to get here.

You can check out my other Elden Ring articles here:
- Elden Ring: Thops Questline [Complete Guide] + Maps
- Elden Ring: Village of the Albinaurics Walkthrough [Complete Guide]
- Elden Ring: Minor Erdtree Catacombs [Ultimate Guide]
- Elden Ring: Stormfoot Catacombs Walkthrough + Guide
- Elden Ring: How To Make It Safely Down to Limgrave Beach and Find The Haligdrake Talisman
- Elden Ring: The Easy Way To Make It Through Fringefolk Hero’s Grave
Feel like supporting me to write more game guides?
f you’ve found any of my guides helpful and you want to shout me a coffee to help power future work, feel free to do so through Ko-Fi below 🙂